
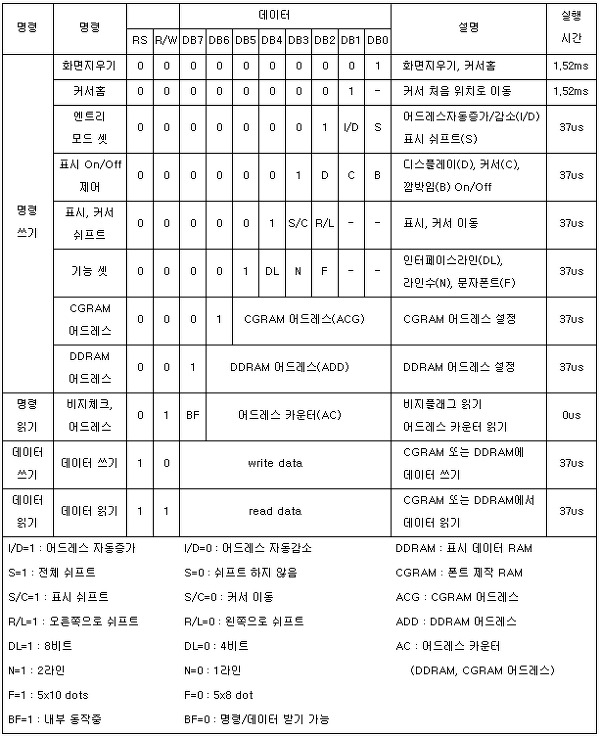
1. LCD 제어기의 내부 구성
명령(Instruction)과 데이터(Data)를 위한 2개의 레지스터, BF(Busy Flag), AC(Address Counter), 문자발생램(CGRAM), 문자발생롬(CGROM), 데이터표시램(DDRAM)이 있습니다.
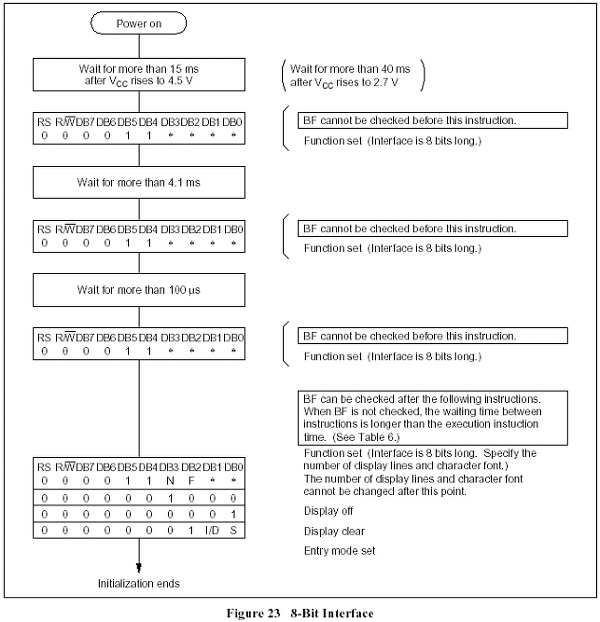
8bit interface
#define sbi(x, y) (x |= (1 << y)) // x의 y 비트를 설정(1)
#define cbi(x, y) (x &= ~(1 << y)) // x의 y 비트를 클리어(0)
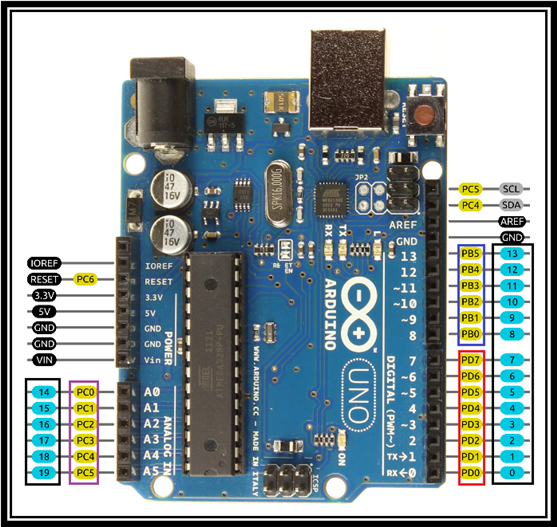
#define LCD_DATA_DIR DDRD
#define LCD_DATA_IN PIND
#define LCD_DATA PORTD
#define LCD_IR_DIR DDRB // 명령어는 B port 사용
#define LCD_IR PORTB
const unsigned int IR_RS = 0;
const unsigned int IR_RW = 1;
const unsigned int IR_E = 2;
void setup() {
// pin out 설정
DDRC = 1;
init_pin();
init_LCD();
LCD_wData();
}
void init_pin()
{
LCD_DATA_DIR = 0xFF;
sbi(LCD_IR_DIR,IR_RS);
sbi(LCD_IR_DIR,IR_RW);
sbi(LCD_IR_DIR,IR_E);
}
void init_LCD()
{
delay(15);
//-----------step 1 -----------------
cbi(LCD_IR,IR_RS);
cbi(LCD_IR,IR_RW);
delayMicroseconds(1);
sbi(LCD_IR,IR_E);
delayMicroseconds(1);
LCD_DATA = 0b0011000;
delayMicroseconds(1);
cbi(LCD_IR,IR_E);
delay(5);
//-----------step 2 -----------------
cbi(LCD_IR,IR_RS);
cbi(LCD_IR,IR_RW);
delayMicroseconds(1);
sbi(LCD_IR,IR_E);
delayMicroseconds(1);
LCD_DATA = 0b00110000;
delayMicroseconds(1);
cbi(LCD_IR,IR_E);
delayMicroseconds(100);
//-----------step 3 -----------------
cbi(LCD_IR,IR_RS);
cbi(LCD_IR,IR_RW);
delayMicroseconds(1);
sbi(LCD_IR,IR_E);
delayMicroseconds(1);
LCD_DATA = 0b00110000;
delayMicroseconds(1);
cbi(LCD_IR,IR_E);
delayMicroseconds(1);
//-----------8bit interface, 2 Line -----------------
cbi(LCD_IR,IR_RS);
cbi(LCD_IR,IR_RW);
delayMicroseconds(1);
sbi(LCD_IR,IR_E);
delayMicroseconds(1);
LCD_DATA = 0b00111000;
delayMicroseconds(1);
cbi(LCD_IR,IR_E);
delayMicroseconds(1);
//----------- 디스플레이 , 커서 , 깜박임 off -----------------
cbi(LCD_IR,IR_RS);
cbi(LCD_IR,IR_RW);
delayMicroseconds(1);
sbi(LCD_IR,IR_E);
delayMicroseconds(1);
LCD_DATA = 0b00001000;
delayMicroseconds(1);
cbi(LCD_IR,IR_E);
delayMicroseconds(1);
//-----------화면 지우기 커서홈 -----------------
cbi(LCD_IR,IR_RS);
cbi(LCD_IR,IR_RW);
delayMicroseconds(1);
sbi(LCD_IR,IR_E);
delayMicroseconds(1);
LCD_DATA = 0b00000001;
delayMicroseconds(1);
cbi(LCD_IR,IR_E);
delayMicroseconds(1);
//-----------entry mode set(자동 어드레스 증가 , 전체 쉬프트) -----------------
cbi(LCD_IR,IR_RS);
cbi(LCD_IR,IR_RW);
delayMicroseconds(1);
sbi(LCD_IR,IR_E);
delayMicroseconds(1);
LCD_DATA = 0b00000111;
delayMicroseconds(1);
cbi(LCD_IR,IR_E);
delayMicroseconds(1);
}
unsigned char LCD_rCommand(void)
{
unsigned char temp=1;
LCD_DATA_DIR = 0X00;
cbi(LCD_IR, IR_RS); // 0번 비트 클리어, RS = 0, 명령
sbi(LCD_IR, IR_RW); // 1번 비트 설정, RW = 1, 읽기
delayMicroseconds
sbi(LCD_IR, IR_E); // 2번 비트 설정, E = 1
delayMicroseconds(1);
temp = LCD_DATA_IN; // 명령 읽기
delayMicroseconds(1);
cbi(LCD_IR, IR_E); // 명령 읽기 동작 끝
LCD_DATA_DIR = 0XFF;
delayMicroseconds(1);
return temp;
}
char LCD_BusyCheck(unsigned char temp)
{
if(temp & 0x80) return 1;
else return 0;
}
void LCD_wData(){
while(LCD_BusyCheck(LCD_rCommand()))
delayMicroseconds(1);
PORTC = 1;
sbi(LCD_IR, IR_RS); // 0번 비트 설정, RS = 1, 데이터
cbi(LCD_IR, IR_RW); // 1번 비트 클리어, RW = 0, 쓰기
delayMicroseconds(1);
sbi(LCD_IR, IR_E); // 2번 비트 설정, E = 1
LCD_DATA = 0b00110000; // 데이터 출력
delayMicroseconds(1);
cbi(LCD_IR, IR_E); // 데이터 쓰기 동작 끝
delayMicroseconds(1);
}
void loop() {
// put your main code here, to run repeatedly:
}
출처:https://kogun.tistory.com/23
AVR(ATmaga128)로 텍스트LCD 장난하기
안녕하세요 고군입니다~ 이번 시간에는 텍스트LCD에 대하여 알아보고 AVR을 사용하여 화면을 표시해보도록 하겠습니다. LCD는 저렴한 가격으로 인해 산업현장에서는 아직도 많이 사용되고 있으
kogun.tistory.com
#define sbi(x, y) (x |= (1 << y))  // x의 y 비트를 설정(1)
#define cbi(x, y) (x &= ~(1 << y)) // x의 y 비트를 클리어(0)

#define LCD_DATA_DIR DDRD
#define LCD_DATA_IN PIND
#define LCD_DATA PORTD

#define LCD_IR_DIR DDRB // 명령어는 B port 사용
#define LCD_IR PORTB

const unsigned int IR_RS = 0;
const unsigned int IR_RW = 1;
const unsigned int IR_E  = 2;

void setup() {
  // pin out 설정
  DDRC = 1;
  init_pin();
  init_LCD();
  Lcd_DataWrite('0');
}

void Lcd_CmdWrite(char ch)
{
  // 상위 bit 전송
  cbi(LCD_IR,IR_RS);
  cbi(LCD_IR,IR_RW);
  delayMicroseconds(1);
  sbi(LCD_IR,IR_E);
  LCD_DATA = (ch & 0xF0) ;
  delayMicroseconds(1);


  // 하위 bit 전송
  cbi(LCD_IR,IR_RS);
  cbi(LCD_IR,IR_RW);
  delayMicroseconds(1);
  sbi(LCD_IR,IR_E);
  LCD_DATA = ((ch<<4) & 0xF0) ;
  delayMicroseconds(1);
}


void Lcd_DataWrite(char ch)
{
  // 상위 bit 전송
  sbi(LCD_IR,IR_RS);
  cbi(LCD_IR,IR_RW);
  delayMicroseconds(1);
  sbi(LCD_IR,IR_E);
  LCD_DATA = (ch & 0xF0) ;
  delayMicroseconds(1);


  // 하위 bit 전송
  sbi(LCD_IR,IR_RS);
  cbi(LCD_IR,IR_RW);
  delayMicroseconds(1);
  sbi(LCD_IR,IR_E);
  LCD_DATA = ((ch<<4) & 0xF0) ;
  delayMicroseconds(1);
}


void init_pin()
{
    LCD_DATA_DIR = 0xFF;
    sbi(LCD_IR_DIR,IR_RS);
    sbi(LCD_IR_DIR,IR_RW);
    sbi(LCD_IR_DIR,IR_E);
}

void init_LCD()
{
  delay(15);
  //-----------step 1 -----------------
  cbi(LCD_IR,IR_RS);
  cbi(LCD_IR,IR_RW);
  delayMicroseconds(1);
  sbi(LCD_IR,IR_E);
  delayMicroseconds(1);
  LCD_DATA = 0b0011000;
  delayMicroseconds(1);
  cbi(LCD_IR,IR_E);
  delay(5);
  //-----------step 2 -----------------
  cbi(LCD_IR,IR_RS);
  cbi(LCD_IR,IR_RW);
  delayMicroseconds(1);
  sbi(LCD_IR,IR_E);
  delayMicroseconds(1);
  LCD_DATA = 0b00110000;
  delayMicroseconds(1);
  cbi(LCD_IR,IR_E);
  delayMicroseconds(100);
  //-----------step 3 -----------------
  cbi(LCD_IR,IR_RS);
  cbi(LCD_IR,IR_RW);
  delayMicroseconds(1);
  sbi(LCD_IR,IR_E);
  delayMicroseconds(1);
  LCD_DATA = 0b00110000;
  delayMicroseconds(1);
  cbi(LCD_IR,IR_E);
  delayMicroseconds(1);
 //-----------4bit interface -----------------
  cbi(LCD_IR,IR_RS);
  cbi(LCD_IR,IR_RW);
  delayMicroseconds(1);
  sbi(LCD_IR,IR_E);
  delayMicroseconds(1);
  LCD_DATA = 0b00100000;
  delayMicroseconds(1);
  cbi(LCD_IR,IR_E);
  delayMicroseconds(1);
  //-----------5x7 style 2 Line -----------------
  Lcd_CmdWrite(0b00101000);
   //----------- 디스플레이 , 커서 , 깜박임 off -----------------
  Lcd_CmdWrite(0b00001000);
     //-----------화면 지우기 커서홈 -----------------
  Lcd_CmdWrite(0b00000001);
  //-----------entry mode set(자동 어드레스 증가 , 전체 쉬프트)  -----------------
  Lcd_CmdWrite(0b00000111);
}


void loop() {
  // put your main code here, to run repeatedly:

}'공부,일 > atmega328P' 카테고리의 다른 글
| 스케치 파일 컴파일러 (0) | 2021.10.06 |
|---|---|
| timer1 , 1초 깜빡이 코드 (0) | 2021.10.05 |
| my 초음파 센서 만들기 (0) | 2021.09.15 |
| atmel studio 에서 printf, scanf 사용 (0) | 2021.08.11 |
| atmega328P TWI(I2C) 통신 (3) 실습 (0) | 2021.08.07 |


댓글