

SCL = PC5
SDA = PC4
실습 프로그램 소개
(대충읽고 코드를 보면서 다시 보기 바란다. )
2개의 아두이노 우노 보드로 TWI 통신을 한다.
1대는 마스터 모드로 ,1대는슬레이브 모드로 작동한다.
1. 마스터 송신 모드로 0x01 을 전달한다.
2. 슬레이브 수신 모드로 0x01 을 전달 받는다.
3. 마스터 수신 모드로 데이터를 요청한다.
3. 슬레이브 송신 모드로 받은 0x01 의 데이터를 토글해서 돌려준다.
4. 마스터는 토글된 데이타를 1bit 시프트 시켜준다.
아두이노는 받은 데이터로 PORTD에 달려있는 불을 킨다.
(코드 상으로는 8개의 포트를 모두 조절하고 있지만 LED 가 없어서 4개씩만 사용하였다.)
슬레이브의 어드레스는 0x20 으로 하겠다.
풀업 저항 구하기
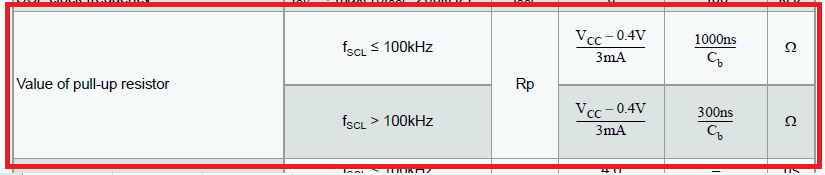
위 의 공식을 계산해보면 Vcc 5v
기준 풀업저항 최솟 값은 1533.33 옴이다. 1킬로 옴 밖에 없어서 직렬로 2킬로 옴을 만들어서 사용하겠다 .
cf) 사실 내부 풀업저항을 사용한다면 (20 ~ 50k 옴) 상관 없지만 외부 풀업을 사용해 보겠다.
TWBR 값 구하기

계산해보면 TWBR 이 72 일때 100Khz 가 나온다. (분주비 1일때)
데이타 시트에 보면 data transfer speed 는 400Khz 까지 가능하다고 나와 있음으로 100Khz 를 사용하겠다.
레지스터 초기 값 확인
void setup()
{
  Serial.begin(9600);
  Serial.print("TWBR : ");
  Serial.println(TWBR,BIN);
  Serial.print("TWSR : ");
  Serial.println(TWSR,BIN);
  Serial.print("TWCR : ");
  Serial.println(TWCR,BIN);
  Serial.print("TWCMR : ");
  Serial.println(TWAMR,BIN);
}

  void loop()
{
}
TWSR 는 초기화를 해준다.
Master T code
다른 부분은 상관없지만
setup 에 delay 는 조금 길게 줘야한다.
보통 실험에서는 마스터와 슬레이브에 동시에 전원을 주곤 하는데
슬레이브가 먼저 동작하고 있어야지 밑의 프로그램이 정상적으로 동작한다.
void TWI_start(void);
void TWI_repeated_start(void);
void TWI_init_master(void);
void TWI_write_address(unsigned char);
void TWI_read_address(unsigned char);
void TWI_write_data(unsigned char);
void TWI_read_data(void);
void TWI_stop(void);

unsigned char address=0x20;
unsigned char read=1, write=0;
unsigned char write_data=0x01, recv_data;

void setup()
{
  delay(2000);
  DDRD=0xff;
  TWI_init_master();  // Function to initialize TWI
}

void loop()
{
    if(write_data==0x00) write_data=1;

    TWI_start();// Function to send start condition
    TWI_write_address(address+write); // Function to write address and data direction bit(write) on SDA
    TWI_write_data(write_data);      // Function to write data in slave
    TWI_stop(); // Function to send stop condition

    delay(10);

    TWI_start();
    TWI_read_address(address+read); // Function to write address and data direction bit(read) on SDA
    TWI_read_data(); // Function to read data from slave
    TWI_stop();

    delay(1000);
    write_data = (write_data<<1);
}

void TWI_read_data(void)
{
    TWCR=(1<<TWINT)|(1<<TWEN);    // Clear TWI interrupt flag,Enable TWI
    while (!(TWCR & (1<<TWINT))); // Wait till complete TWDR byte transmitted
    while((TWSR & 0xF8) != 0x58); // Check for the acknoledgement
    recv_data=TWDR;
    PORTD=recv_data;
}

void TWI_read_address(unsigned char data)
{
    TWDR=data; // Address and read instruction
    TWCR=(1<<TWINT)|(1<<TWEN);    // Clear TWI interrupt flag,Enable TWI
    while (!(TWCR & (1<<TWINT))); // Wait till complete TWDR byte received
    while((TWSR & 0xF8)!= 0x40);  // Check for the acknoledgement
}

void TWI_init_master(void) // Function to initialize master
{
    TWBR=72; // Bit rate
    TWSR=(0<<TWPS1)|(0<<TWPS0); // Setting prescalar bits
}

void TWI_start(void)
{
    // Clear TWI interrupt flag, Put start condition on SDA, Enable TWI
    TWCR= (1<<TWINT)|(1<<TWSTA)|(1<<TWEN);
    while(!(TWCR & (1<<TWINT))); // Wait till start condition is transmitted
    while((TWSR & 0xF8)!= 0x08); // Check for the acknowledgement
}

void TWI_write_address(unsigned char data)
{
    TWDR=data; // Address and write instruction
    TWCR=(1<<TWINT)|(1<<TWEN);    // Clear TWI interrupt flag,Enable TWI
    while (!(TWCR & (1<<TWINT))); // Wait till complete TWDR byte transmitted
    while((TWSR & 0xF8)!= 0x18);  // Check for the acknoledgement
}

void TWI_write_data(unsigned char data)
{
    TWDR=data; // put data in TWDR
    TWCR=(1<<TWINT)|(1<<TWEN);    // Clear TWI interrupt flag,Enable TWI
    while (!(TWCR & (1<<TWINT))); // Wait till complete TWDR byte transmitted
    while((TWSR & 0xF8) != 0x28); // Check for the acknoledgement
}


void TWI_stop(void)
{
    // Clear TWI interrupt flag, Put stop condition on SDA, Enable TWI
    TWCR= (1<<TWINT)|(1<<TWEN)|(1<<TWSTO);
    while(!(TWCR & (1<<TWSTO)));  // Wait till stop condition is transmitted
}
Slave S code
TWI_match _xx 함수를 보면 알수 있는데 TWSR 레지스터에 값을 받을때까지 계속해서 TWINT 를 clear 해주고 다시 1로 set 될때까지 기다리면서 TWI 가 동작하도록 해줘야 한다.
void TWI_init_slave(void);
void TWI_match_read_slave(void);
void TWI_read_slave(void);
void TWI_match_write_slave(void);
void TWI_write_slave(void);

unsigned char write_data,recv_data;

void setup()
{
    DDRD=0xff;
    TWI_init_slave(); // Function to initilaize slave
}

void loop()
{
    TWI_match_read_slave(); //Function to match the slave address and slave dirction bit(read)
    TWI_read_slave(); // Function to read data

    write_data=~recv_data; // Togglem the receive data

    TWI_match_write_slave(); //Function to match the slave address and slave dirction bit(write)
    TWI_write_slave();       // Function to write data
}

void TWI_init_slave(void) // Function to initilaize slave
{
    TWAR=0x20; // Fill slave address to TWAR
}

void TWI_match_write_slave(void) //Function to match the slave address and slave dirction bit(write)
{
    while((TWSR & 0xF8)!= 0xA8) // Loop till correct acknoledgement have been received
    {
        // Get acknowlegement, Enable TWI, Clear TWI interrupt flag
        TWCR=(1<<TWEA)|(1<<TWEN)|(1<<TWINT);
        while (!(TWCR & (1<<TWINT)));  // Wait for TWINT flag
    }
}

void TWI_write_slave(void) // Function to write data
{
    TWDR= write_data;           // Fill TWDR register whith the data to be sent
    TWCR= (1<<TWEN)|(1<<TWINT);   // Enable TWI, Clear TWI interrupt flag
    while((TWSR & 0xF8) != 0xC0); // Wait for the acknowledgement
}


void TWI_read_slave(void)
{
    // Clear TWI interrupt flag,Get acknowlegement, Enable TWI
    TWCR= (1<<TWINT)|(1<<TWEA)|(1<<TWEN);
    while (!(TWCR & (1<<TWINT))); // Wait for TWINT flag
    while((TWSR & 0xF8)!=0x80); // Wait for acknowledgement
    recv_data=TWDR; // Get value from TWDR
    PORTD=TWDR; // send the receive value on PORTB
}

void TWI_match_read_slave(void) //Function to match the slave address and slave dirction bit(read)
{
    while((TWSR & 0xF8)!= 0x60)  // Loop till correct acknoledgement have been received
    {
    // Get acknowlegement, Enable TWI, Clear TWI interrupt flag
    TWCR=(1<<TWEA)|(1<<TWEN)|(1<<TWINT);
    while (!(TWCR & (1<<TWINT)));  // Wait for TWINT flag
    }
}

코드 출처:
https://www.engineersgarage.com/how-to-use-i2c-twi-two-wire-interface-in-avr-atmega32-part-36-46/
How to use I2C / TWI (Two Wire Interface) in AVR ATmega32- (Part 36/46)
This article explores the TWI interfacing between two ATmega32 controllers. Readers are advised to go through TWI Communication and TWI registers[[wysiwyg_imageupload::]]of ATmega32 before going further. Generally modes 1 & 3 and modes 2 & 4 are us
www.engineersgarage.com
참고로 위는 atmel studio 에서 작성 한것 같다 나는 아두이노 스케치를 사용해서 구현 했다.
'공부,일 > atmega328P' 카테고리의 다른 글
| my 초음파 센서 만들기 (0) | 2021.09.15 |
|---|---|
| atmel studio 에서 printf, scanf 사용 (0) | 2021.08.11 |
| atmega328P TWI(I2C) 통신 (2) (0) | 2021.08.05 |
| atmega328P TWI(I2C) 통신 (1) 개념 및 레지스터 (0) | 2021.08.05 |
| atmega 328p USART (3) 실습 (0) | 2021.08.02 |


댓글